OpenCVでボロノイ分割とドロネー分割
OpenCVを使ってボロノイ分割とドロネー分割をした.
実行環境
特徴点の抽出
画像から特徴点を取り出すのに, Shi-Tomashiのコーナー検出法を利用する.
void goodFeaturesToTrack(InputArray image,       // 入力画像
             OutputArray corners,      // 検出されたコーナー
             int maxCorners,         // コーナーの最大数
             double qualityLevel,      // クオリティレベル(0.0~1.0)
             double minDistance,       // コーナー間の最小ユーグリット距離
             InputArray mask=noArray(),
             int blockSize=3,
             bool useHarrisDetector=false,
             double k=0.04 )
具体的には
// Shi-Tomasi Corner Detector
int maxCorners = 0;
vector<Point2f> corners;
goodFeaturesToTrack(img, corners, maxCorners, 0.01, 50);
のようにして行う.
Subdiv2Dの初期化
分割を行うために必要なSubdiv2Dを初期化する.
Mat out = imread(filename); // 出力用
Size size = out.size();
Rect rect(0, 0, size.width, size.height);
Subdiv2D subdiv(rect);
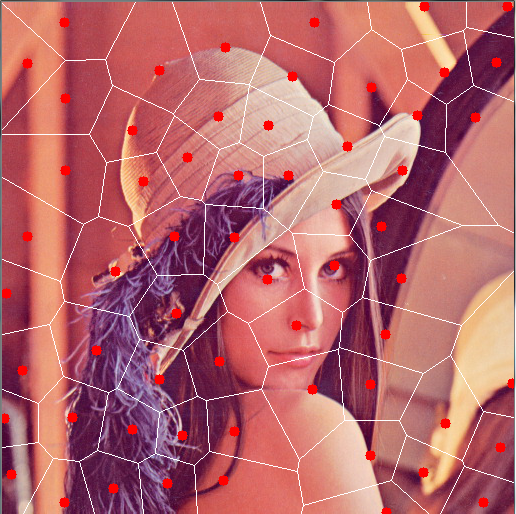
ボロノイ図を書く
ボロノイ分割, ドロネー分割を行う前に, 先程取得した点をSubdiv2Dに追加する.
subdiv.insert(corners);
ボロノイ図を書くには, getVoronoiFacetListを使う.
void cv::Subdiv2D::getVoronoiFacetList(const std::vector< int > &idx,
                                       std::vector< std::vector< Point2f > > &facetList,
                                       std::vector< Point2f > &facetCenters
                                      )
このメソッドを呼び出すと, facetListにベクトルの集合が格納される. 今回はdraw_voronoiという関数を定義した.
void draw_voronoi(Mat &img, Subdiv2D &subdiv){
    vector<vector<Point2f> > facetList;
    vector<Point2f> facetCenters;
    subdiv.getVoronoiFacetList(vector<int>(), facetList, facetCenters);

    for(auto &trig : facetList){
        vector<Point2f>::iterator it = trig.begin();
        Point2f p1 = *it;
        it++;
        while(it != trig.end()){
            Point2f p2 = *it;
            line(img, p1, p2, Scalar(255, 255, 255));
            p1 = p2;
            it++;
        }
    }
}
もうちょっときれいにかけないものか.
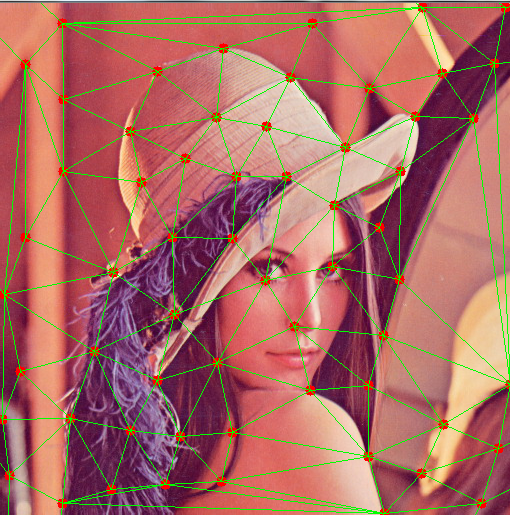
ドロネー図を書く
方法としては2つ存在していて,
- getEdgeListメソッドですべての辺を取得する方法
- getTriangleListメソッドで三角形を取得する方法
が存在する. 今回はgetEdgeListを使う.
void cv::Subdiv2D::getEdgeList(std::vector< Vec4f > &edgeList)const
引数として与えたedgeListに辺が格納される.(変数名のとおりだが)今回は, draw_delaunayという関数を定義した.
void draw_delaunay(Mat &img, Subdiv2D &subdiv){
    vector<Vec4f> edges;
    subdiv.getEdgeList(edges);

    for(auto &edge:edges){
        line(img, Point2f(edge[0], edge[1]), Point2f(edge[2], edge[3]), Scalar(0, 255, 0));
    }
}
ソースコード
以下に今回使用したソースコードを示す.
#include <iostream>
#include <opencv2/core.hpp>
#include <opencv2/highgui.hpp>
#include <opencv2/imgproc.hpp>

using namespace std;
using namespace cv;

void draw_point(Mat& img, Point2d p, Scalar color){
    circle(img, p, 5, color, -1);
}

void draw_delaunay(Mat &img, Subdiv2D &subdiv){
    vector<Vec4f> edges;
    subdiv.getEdgeList(edges);

    for(auto &edge:edges){
        line(img, Point2f(edge[0], edge[1]), Point2f(edge[2], edge[3]), Scalar(0, 255, 0));
    }
}

void draw_voronoi(Mat &img, Subdiv2D &subdiv){
    vector<vector<Point2f> > facetList;
    vector<Point2f> facetCenters;
    subdiv.getVoronoiFacetList(vector<int>(), facetList, facetCenters);

    for(auto &trig : facetList){
        vector<Point2f>::iterator it = trig.begin();
        Point2f p1 = *it;
        it++;
        while(it != trig.end()){
            Point2f p2 = *it;
            line(img, p1, p2, Scalar(255, 255, 255));
            p1 = p2;
            it++;
        }
    }
}

int main() {
    string filename = "ファイルのパス";

    cout << CV_VERSION << endl;
    // 対象画像をグレイスケールで読み込み
    Mat img = imread(filename, IMREAD_GRAYSCALE);


    // Shi-Tomasi Corner Detector
    int maxCorners = 0;
    vector<Point2f> corners;
    goodFeaturesToTrack(img, corners, maxCorners, 0.01, 50);

    // 出力用ファイルを作成
    Mat out = imread(filename);
    for(auto &point : corners){
        draw_point(out, point, Scalar(0,0,255));
    }

    // Delaunay分割のためのSubdiv2Dを初期化
    Size size = out.size();
    Rect rect(0, 0, size.width, size.height);
    Subdiv2D subdiv(rect);

    // 点を追加する
    subdiv.insert(corners);

    draw_voronoi(out, subdiv);
    draw_delaunay(out, subdiv);

    namedWindow("Delaunay");
    imshow("Delaunay", out);

    waitKey();

    return 0;
}
- ボロノイ図

- ドロネー図

参考サイト
OpenCV: cv::Subdiv2D Class Reference
Shi-Tomasiのコーナー検出とGood Features to Track(追跡に向いた特徴) — OpenCV-Python Tutorials 1 documentation